I recently bought a few Atmega328PU chips to use in some project. Its better to use these bare ICs in the circuits instead of putting the whole Arduino Uno or Nano board, as their cost is higher. But the problem with bare Atmega328 ICs is that usually there is no bootloader installed in them and you need a saperate programmer to program them before you put them in your circuits.
Arduino’s official website shows this easy way of using Arduino Uno as a programmer for the Atmega328 IC, but what if I have an Arduino Nano?You need to modify this circuit a little to work with a Nano.
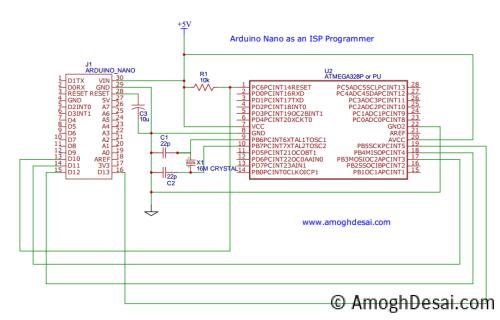
Here’s the circuit for Arduino Nano as programmer:
Circuit Diagram for Arduino Nano As ISP Programmer and Bootloader
PDF File for the Circuit Diagram can be found here
Once you have built this circuit, you are ready to burn a bootloader or burn a sketch to an Atmega328PU or P.
First install a stable version of latest Arduino IDE from here.
Burning a bootloader to Atmega328.
- Open Arduino IDE
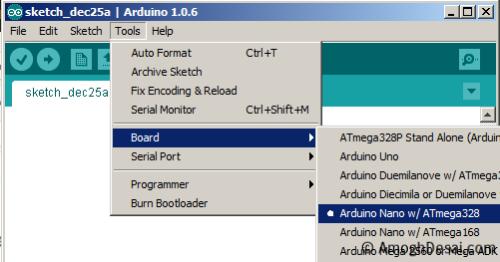
- Click on Tools => Board => Arduino Nano w/ Atmega328

- Now click on Tools => Programmer => Arduino as ISP

- Connect the Circuit to the Computer using USB cable.
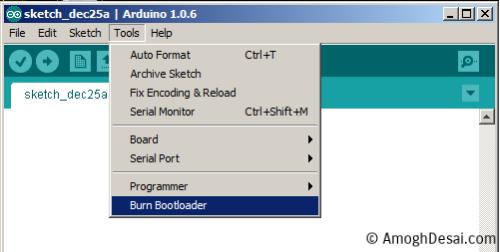
- Click on Tools => click Burn Bootloader

Burning a sketch to Atmega328.
- Open Arduino IDE
- Click on Tools => Board => Arduino Nano w/ Atmega328. (i.e. Confirm Correct board is selected.)
- Now click on Tools => Programmer => Arduino as ISP. (i.e. Confirm Arduino as ISP is selected.)
- Now copy paste or write the sketch in the programming window. You can also copy a downloaded sketch to the sketch directory. On windows its located at C:\Users\*username*\Documents\Arduino Make sure you put each sketch in a specific directory. This way in Arduino IDE you can directly go to File =>Sketchbook => Select the sketch you want to burn.
- Once you have written/copy pasted or selected the sketch click on Sketch => Verify/Compile.

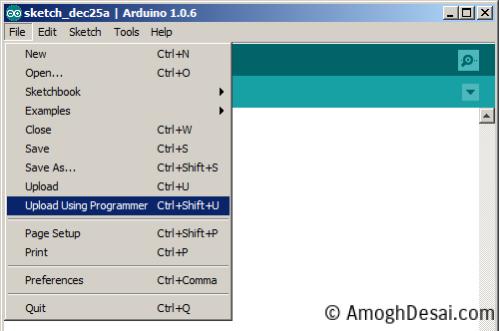
- Now select File => Upload using Programmer

Once the Sketch is burnt to your IC, you are all set to use this chip in your circuits. Let me know if you get any issues or there are any suggestions you want to make to improve this post. You can leave your comments below!
Permalink
Hi Amogh, Lal here ( VU2 LBQ). Ex Pune HAM 😉 from Calicut.
hope you’re fine..
I request some guidance from you regarding Arduino. I remembered your old blog post when came the topic of Arduino based project.
Please provide me some reliable links or info, for Arduino based Humidity measurement system. It is for my lab purpose only. you may even E-mail me whenever convenient. my Mail ID : lalbusher@gmail.com
keep in touch..
73s..
Lal
VU2LBQ
Permalink
Hey Lal,
Nice to hear back from you.
Infact I have done a temperature and Humidity measurement project, but forgot to blog about it.
Ill send you the details in an email.
Amogh
vU3DES
Permalink
Amogh, Thank you for blogging this information. Very helpful and most appreciated.
Permalink
hi amogh
i am just beginner for aurduino nano and atmega328p.
i wanna know is it possible write a code to this chip with language c because i seen all examples codes in arduino ide is done with c++
if possible let me know some links requirements for the project with c
please mail me on : mubasheerahmed12@gmail.com
Permalink
I am trying to upload bootloader on atmega328p-pu by arduino nao as you are showing the following steps.. but my error massege is
Arduino: 1.8.9 (Windows 7), Board: “Arduino Nano, ATmega328P (Old Bootloader)”
avrdude: Yikes! Invalid device signature.
Double check connections and try again, or use -F to override
this check.
Error while burning bootloader.
This report would have more information with
“Show verbose output during compilation”
option enabled in File -> Preferences.
Permalink
I have suggested this to many other earlier as well.. Please use Arduino IDE 1.8.5 and try it again. Many other were successful, try and let me know.
Permalink
After burn bootloader on atmega 328p by nano.. can i burn code by ftdi1232 by tx rx pin.. plz halp me out.. i just want to show deta on serial monitor can it possible by nano isp pins
Permalink
To burn code and use it with serial monitor, you will need the crystal and other basic circuitry with the atmega328p. You cant use the bare atmega328p ic with just power.
Permalink
Amogh, the v.2.3 Nano has an ATmega168-AU already on board. Wont this conflict when I try uploading the codes onto the Additional Micro controller?
Also, the official page https://www.arduino.cc/en/Tutorial/ArduinoToBreadboard says that we should remove the Original Microcontroller on board.
I am not sure if it is the same case here because the images displayed on the page seem to be UNO and not Nano.
Also, can I use the same process for ATMEGA328 (without the P or PU)
Please guide me.